
Setting up the categories on your WordPress website is one of the first steps you need to accomplish when starting a new website. It is a basic yet important setting both for the structure of your content and also to be found and indexed by search engines. Excellent category management on your website ends up with a user-friendly interface, where the users can easily navigate through your content.
What are categories?
A category is basically a container of posts with a meaningful name placed at a proper place on your website. That’s to say, when you create and publish a post on your website, you specify the category of the post from the Categories list you have already created, and it falls under that specific category. Several posts can go under the same category, so when the user selects a category on your website, all the posts related to that category will show up. It is the same as real-world classification when you manage things by categorizing them into specific classes so as to set them up properly and reach them easily later on. This is how the visitors can enjoy the easy accessibility and navigation of your content.
How to create categories on your website?
There are two ways to create a new category. One way is by adding new categories from the left panel when you are creating a new post. The next and standard way is using the WordPress Dashboard panel. We do not recommend the first method as far as you can not set the detailed options and requirements (Slug, Description, Color-class, and SEO considerations) through, however, I go with the detailed description on how to do so.
Creating new categories using new posts page
Follow the below steps to create new categories using the new post page.
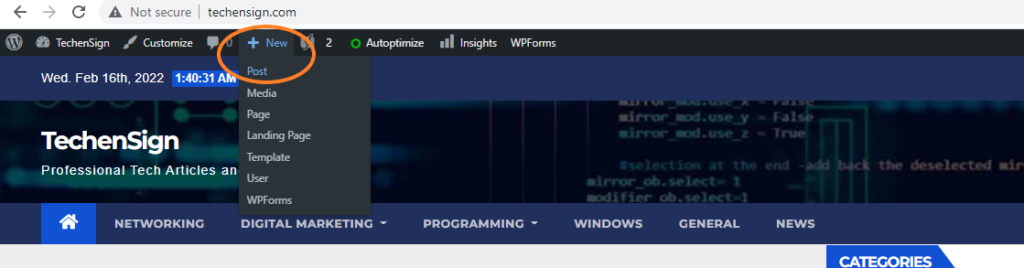
- Create a new post: hover your mouse on New tab on the top bar of your side and click on Post (you must be logged in to your website).
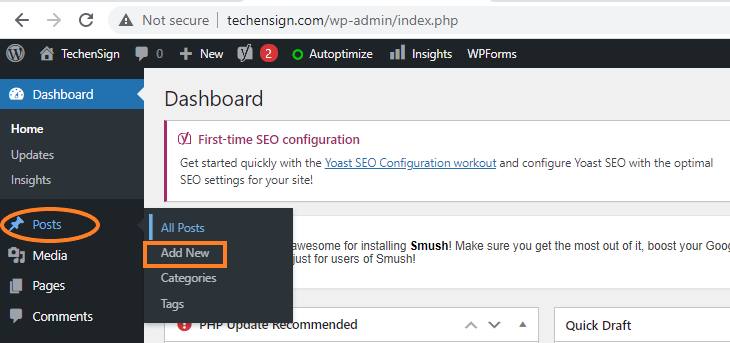
- You can also create new post from the Dashboard panel. Go to the dashboard panel of your WordPress website, select the Posts and click on Add New.
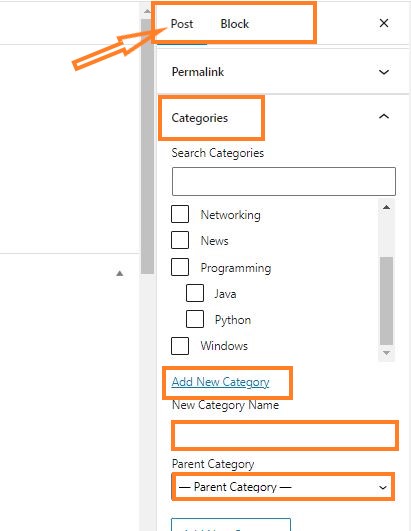
- On the New Post page at the right panel, choose the Post bar. Scroll the panel down, until you see Categories. Click on it to expand it down. If you do not have created a new category yet, there is a default category named “uncategorized” – we will talk about the defaul category later on in Default Category section in this post. Using this section, you can add new category by clicking on Add New Category. Name the category and choose the parent category only if the new category is as a sub-category of an existing one. We will discuss categories and sub-category later on in Category Hierarchy section in this post. For now according to the below pic, create a new category.
Creating new categories using WordPress Dashboard
Using this method, you can add new categories and complete all the details a category has. Followings are the steps to create new categories on your website using the WordPress Dashboard.
- Click on the Dashboard to go to the dashboard panel of your website. see the image.

- Hover the cursor on the Posts and click on the Categories option from the menue.
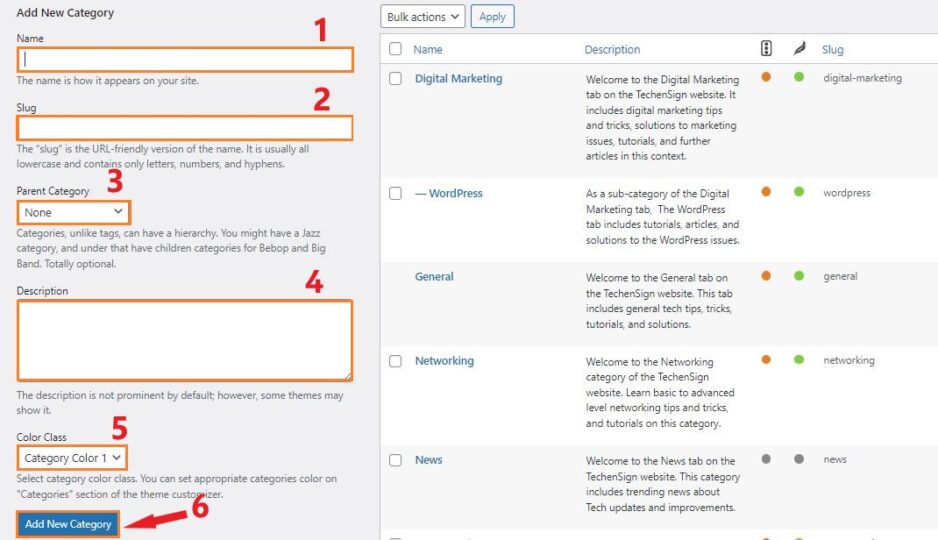
- On the Categories page, name your category in the Name box. Specify the slug in the Slug box. Slug is the URL to the category and by default it is the name of the category with lower case if you do not specify it. if your category is a child category, you must select the parent category from the existing categories – numbered 3 in the image – (we will talk about the parent-child category later on in this article). In the Description box, describe the category – it includes the text you want to show up when a user clicks on the category. Choose the category color from the Color-Class. If your category is a parent category, let it be the Category Color 1. If your Category is a sub-category of the main category, choose the Category Class 2, and so on. Finally, when all the boxes are set, click on the Add New Category button, and it will be added to the list of categories on the right panel on this page.
How to edit a category?
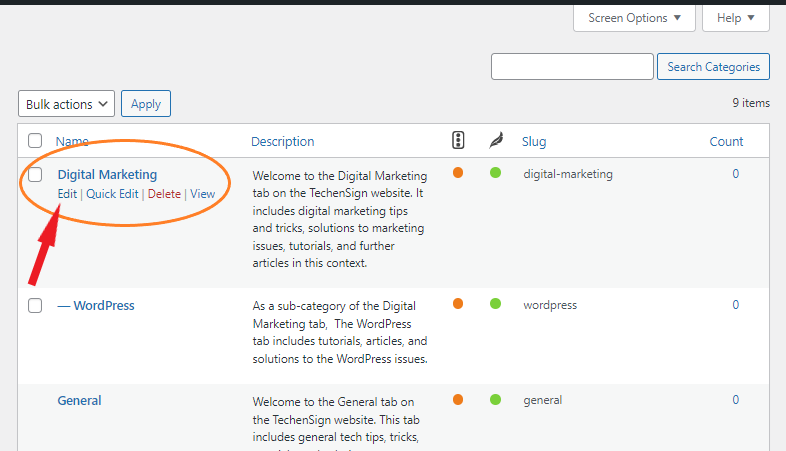
A category may be edited further. To do so, hover your cursor on the category you want to edit. There are Edit, Quick Edit, Delete and View options. Click on the Edit option to edit all the details of the category. Play around and test other options too.
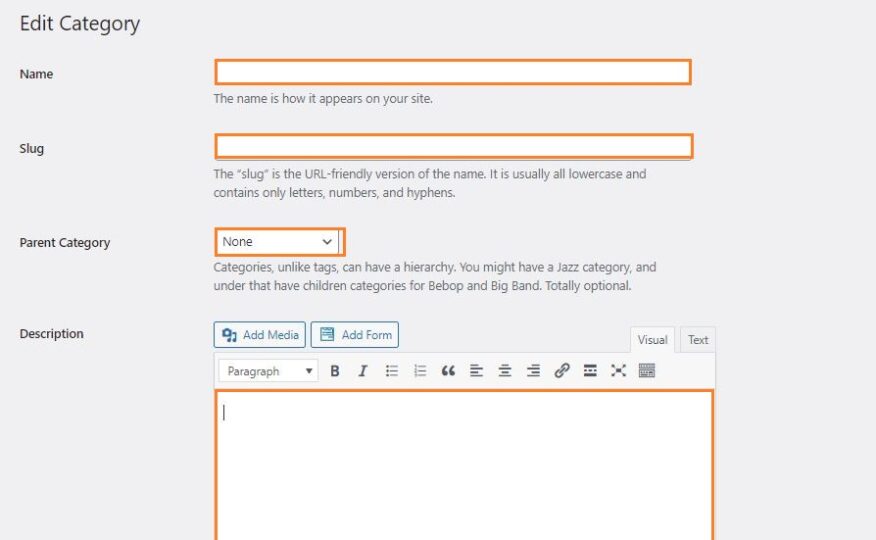
You can edit the Name, Slug, Hierarchy level – choosing the parent category if it is a child category, Description, and Color Class. in Addition, if you have the SEO installed, you can check and improve the readability and other SEO considerations. Finally, click on the update button on the left-bottom corner.
How to place categories on your website?
After creating and setting required categories, you need to place the categories so the visitors can navigate your content through them. There are two methods to place categories on your website: one by using menus and the other by using widgets.
Placing categories using menus.
Using menus to place categories on your website, you must create a menu and add the categories to that menu. The menu works like an umbrella covering many categories under itself. You need to select the Display Location for your menu so your categories show up. The Display Location varies according to your website template. Anyway, it lists the Display Location when you create a menu.
To go with the first method, follow the below steps.
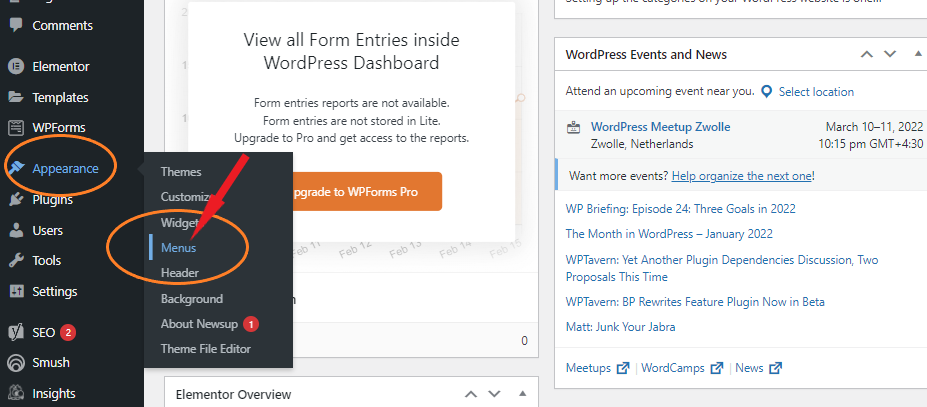
- In the Dashboard panel of your website, hover your cursor on the Appearance option and click on the menus from the list.
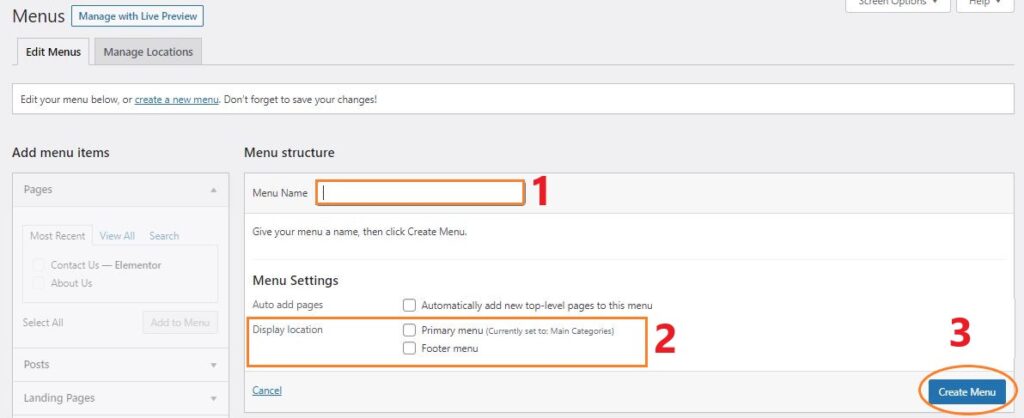
- On the Menus page, name your menu in Menu Name box under the Mune Structure. Select the Display Location for your menu, and click on the Create Menu button.
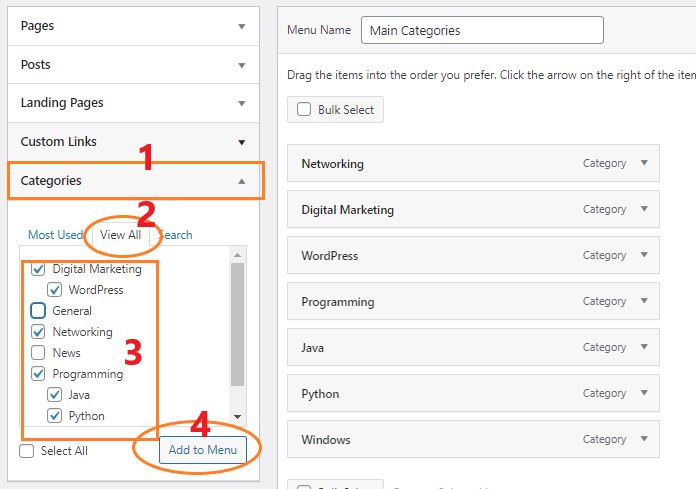
- Now that your menu is created, you can add pages, posts, and in this case categories to your menu. to do so, expand the Catagories by clicking on it. Select the View All bar. Mark the categories you want to add to the menu and click on the Add to Menu button.
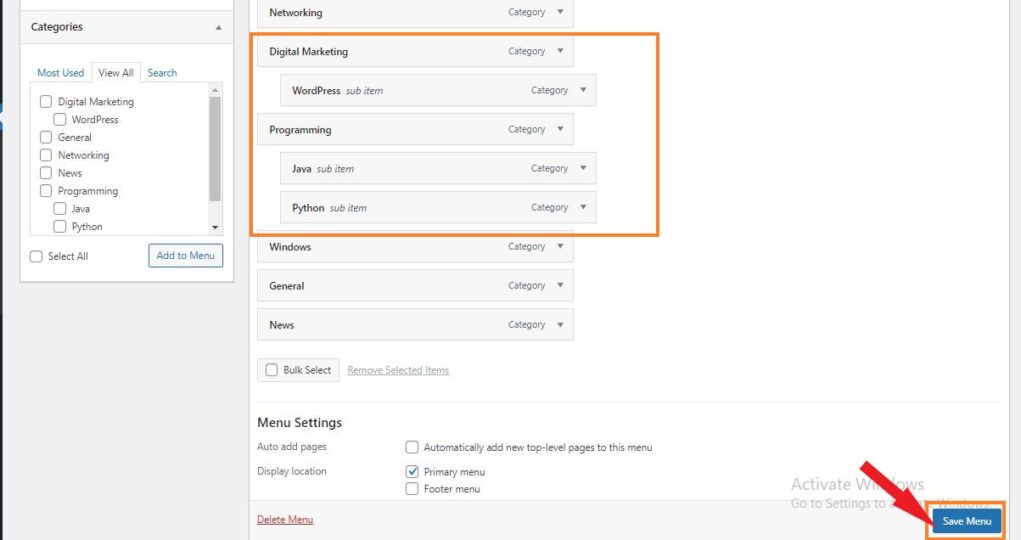
- You can set a category as a sub-category (child-category) of a main category. To do so, simply drag and drop it one level to the right with your mouse. For example we have set Python and Java as sub-catagories of Programming category – see the below picture. A sub-category can have it’s own sub-category. You can organize it the same way. However, when creating a category, make sure to use the the right color-class according to it’s level. If you use the category as a main category, select the Color-Class 1 accordingly, and so forth. The right color class will look proper and beautiful when you publish a post. Additionally, You can also change the order of the categories by simple drag and drop. Just play around and check the result. When everything is set, click on the Save Menu button on the right-bottom corner.
Placing categories using widgets.
As discussed above, using widgets is another way to place categories on your website. To go with this method, follow the below steps.
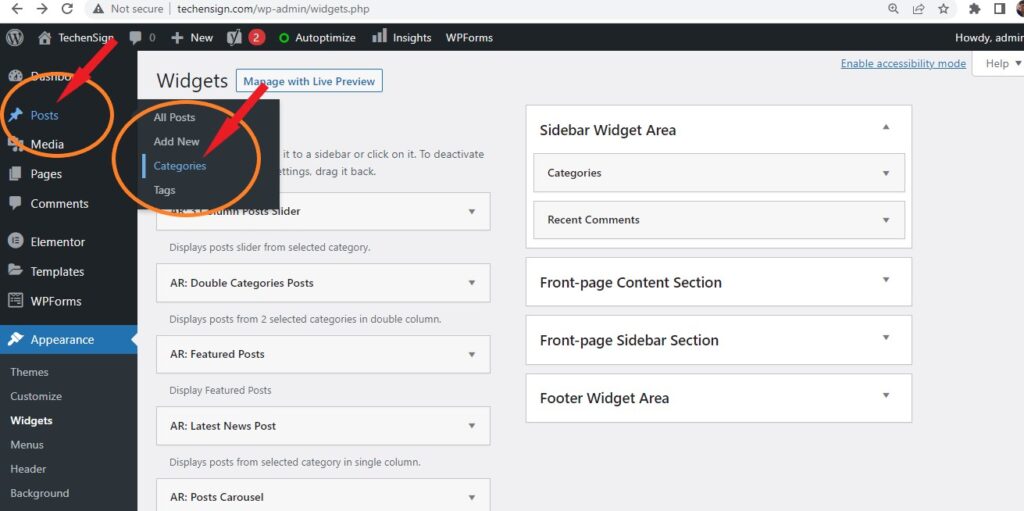
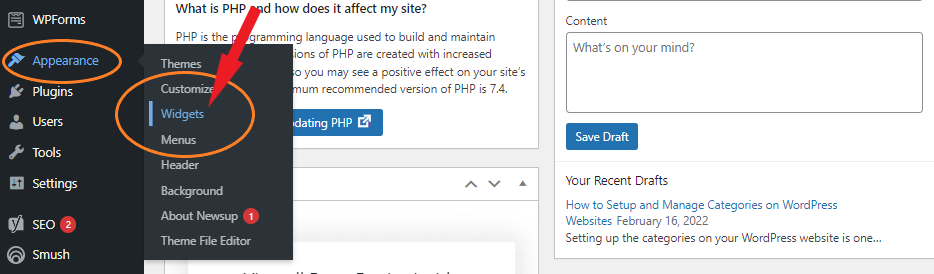
- From the Dashboard, go to Appearence >> Widgets.
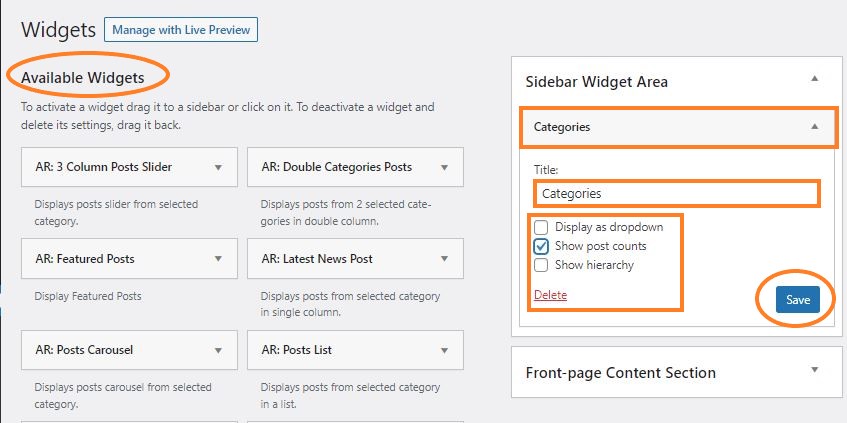
- On the Widgets page, scroll down and find the Categories widget under the Available Widgets section. When found, drag and drop it to the right in Widget Area you want. We have placed it at Sidebar Widget Area as you can see in the below picture. You can set a title for it and choose how to display from the options given. Click on the Save to save the settings.
What is Category Hierarchy?
WordPress categories have the capability to be set in a hierarchical structure. Meaning that a category can have one or many sub-categories, and each sub-category can have its own sub-categories, and so on. Using a meaningful structure for categories, as we said earlier, boosts user experience and helps search engines to index your website. Before creating a category, do some brainstorming. Use a pen and a paper to clear the structure of your categories conceptually, and then go to create categories. It helps you create the right category and set it properly at the first attempt.
How to change WordPress Default Category?
As we said, there is a default category named “Uncategorized” when creating a new post on the WordPress website. The default category is the selected category unless you choose another one manually. You can edit it the same way we described earlier. However, you cannot delete the default category. If you want to delete it, you must first set any other category as a default. To do so, follow the below steps. Remember that only users with the admin privilege can change the default category.
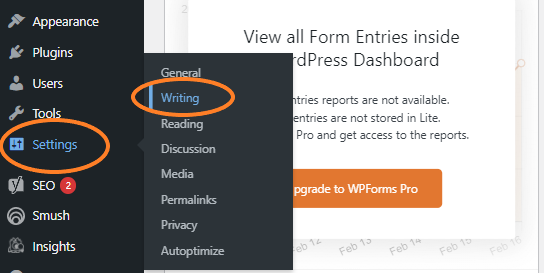
- From the WordPress dashboard panel, select Settings >> Writing.
- On the Writing Settings page, select the category you want to set as the default from the Default Post Category drop down menu.
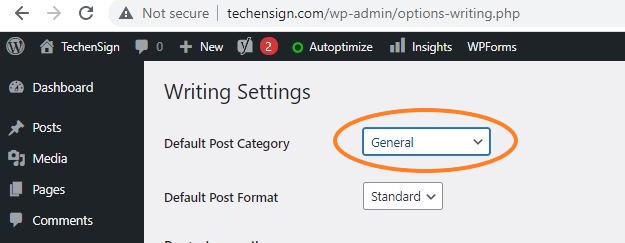
- When it is set, click on the Save Changes button at the left-bottom corner of the page.
We are at the end of this article. Get your hand dirty and play around with setting categories on your website. Once more, I insist you organize categories in a meaningful structure as it plays an important role in the navigability of your content, and ease of use for your visitors. I hope you find this article helpful. If you have any further questions regarding the category management and setup, please let me know in the comment section below. Good luck!
1xBet является одной из самых популярных на рынке. 1xbet рабочее на сегодня прямо Большой выбор событий из мира спорта и киберспорта, множество открытых линий, самые высокие коэффициенты. Кроме того, БК имеет обширный функционал и немногие дает возможность совершать ставки по уникальным промокодам. Используя промокоды, вы можете получить настоящие деньги, не внося абсолютно никаких средств. Это реально! Узнать актуальный промокод вы можете сейчас же, однако использовать его необходимо в соответствии с правилами и инструкциями, которые приведены ниже.
[…] casino games u win real money […]